Friday, October 30, 2015

Organizational "Nesting"

Ok, so as everyone says that the urge to "nest" often comes towards the end of the nine months of baby-carrying and that it often involves cleaning such as mopping, dusting or other tasks of that nature. Well, I don't really like to clean in that way no matter the reason but organizing on the other hand does offer some sort of satisfaction or I at least have the desire to start. So, off I went to gather the needed supplies (mostly "trash") to create these two organizational items for our house.

The first being a much more useful way to organize our ongoing collection of plastic grocery bags. The old system for storage was basically to unload the groceries or other items and then literally just stuff the bags under the sink into no container whatsoever until almost the entire left side space underneath our sink was filled with plastic bags from top to bottom/front to back.

To our credit, it was certainly easy to put them there in half a second. The problem, however, became when you wanted just one bag and you almost always ended up pulling two or more out at a time since they were so cluttered together in such an unorganized way.

So, remembering that my husband had just finished chowing through a giant box of Honey Nut Cheerios I headed to the recycle bin to retrieve it.

 I then proceeded to cut the top flaps off so it had an unobstructed opening. Then I took a roll of white duct tape and covered the entire outside of box with it. The thought was to use the box as the container for the bags and I could just stuff them in. However, as you might expect, the cardboard of a cereal box is not exactly the stiffest material so once you start stuffing it with something as simple as plastic grocery bags, the box starts to look like it might burst.

So, to provide extra support, I scrounged up 6 paint stir sticks and cut them to the width of the box. Then I hot glued 3 of them equally spaced across the width of each side of the box and then wrapped additional tape over/around them to ensure they stayed put.

The final step was to attach the box to the inside right door of our kitchen sink so that it was much easier to access and fit nicely in the inset space on the door and just inside the under-sink area. I attached the box using 6, 3M Command Strips and the final result looks like this:


This whole project took about an hour and now we actually have more space under our sink! Plus, it takes the hassle out of finding and getting our grocery bags together when we need them. Total cost for the project: about $4 for the roll of tape (in which I didn't use even half the roll) and about $3 for the box of cereal.

The second project took quite a bit longer.

This project idea I had seen something similar on Pinterest that you could buy but I had no intention of buying something like this. My goal was to make something that would help organize the extra hangers that seem to pile up in our closet and since we have limited space on our actual closet racks, I don't want to have that valuable space on the rack taken up with empty hangers so I usually tossed them into a large, plastic under bed container that I had.

This project, too, involved gathering some "trash" supplies. I actually retrieved a heavy-duty, cardboard box from the office I work in as well as some spray glue. That along with a roll of package tape, leftover fabric scraps, a utility knife, cutting board, ruler and a pencil. I had all the supplies I needed.

I started by dismantling the box so that the top and bottom flaps were not connected to each other. I then measured and folded the sides to form a triangle. This involved some cutting and taping of edges, bottom flaps and piecing-in additional areas on the bottom to create a flat, even surface on the inside and outside bottom of the box. The assemble triangle looked like this:


I used the hangers as a template for the size so that the box would be big enough for the largest of the hangers but small enough to keep them all organized and from overlapping and getting caught on each other as was the case with my current container.

Once I had this part done, I made a separate triangle piece of cardboard to place in the bottom of the container so that I could cover it separately with fabric and then place it in the bottom. This would prove to be much easier than trying to cover the bottom directly with fabric.

My next step was to cover the sides with a pretty floral fabric scrap left over from another project. I used the spray glue and adhered the fabric to the inside and outside of the box--being careful to overlap onto the bottom on both the inside and outside of the box. I worked one side at a time--spraying the glue and apply the fabric around each side. I used one piece of fabric to go all the way around the entire box. I folded the final edges under itself and glued it down so that it would not be in danger of fraying. I also put additional package tape on all the edges inside and out to further ensure the fabric stays in place and doesn't unravel.

I then covered the separate inside triangle cardboard piece with a scrap of black fabric--gluing and taping the fabric as needed. Once that was finished, I slid that piece snugly into the bottom of the new fabric-lined container.


At this point it was basically finished and I tested it out by placing my hangers inside--a perfect fit!
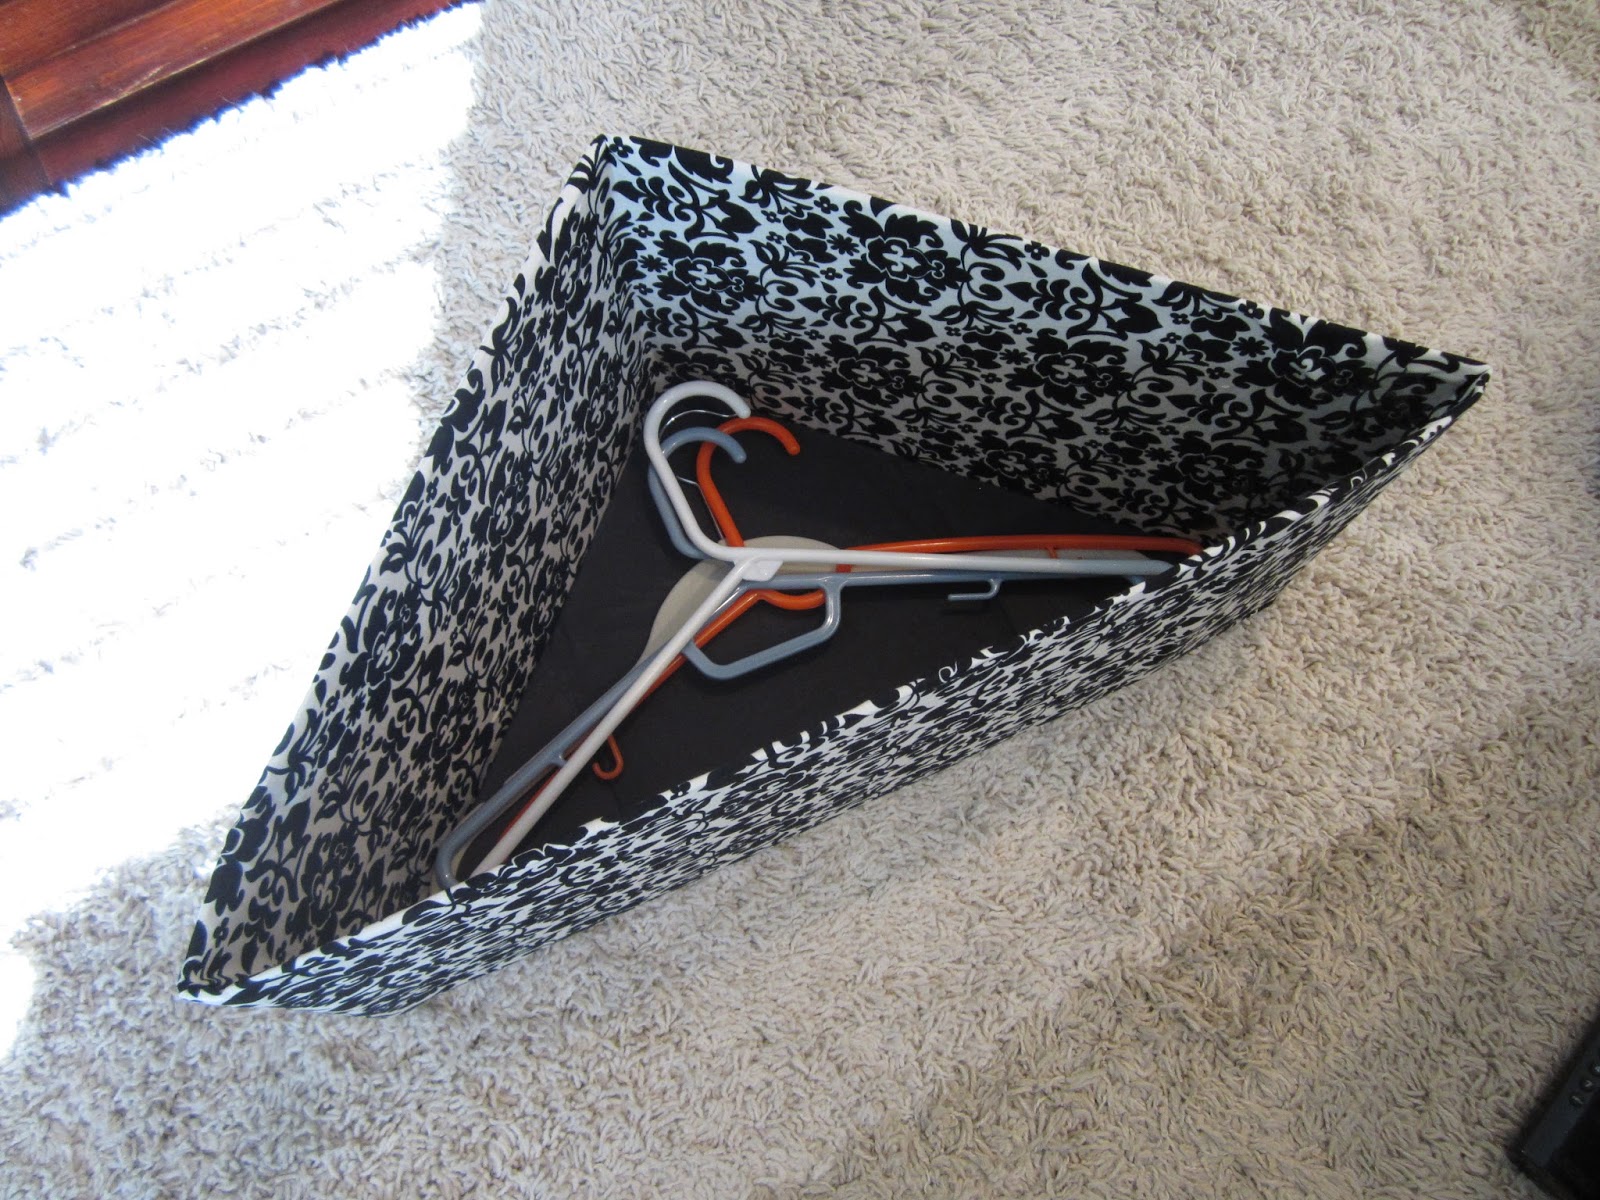

The new container fits much more neatly in our closet and takes up much less space on the floor than the old container, plus it is much easier to use as the hangers no longer get tangled up with each other.

So, success for the day was had by fulfilling a few organizational "nesting" urges and creating some more efficient items for our house. Now, time to wait for the next urge--and of course, the new, little addition to the home.

Sunday, March 15, 2015

A Bike Trainer: Taking you places you've never been

I had never rode a bike on a trainer let alone owned one before. Those are something for "serious" riders. 4 hour "training" rides indoors? Now that's just insane. But I had ran that on a treadmill before so I guess touché. I can't say I hadn't considered getting one before but in addition to the question of the seriousness of my winter biking needs, several issues always came to mind:

  1. It takes up space. Yes, it is additional fitness equipment that frankly our small, 2-bedroom home doesn't accommodate very easily.
  2. It will wear out my bike! I mean I love my bike, even if it is what 'real' bikers would call an entry-level road bike, and the thought of it wearing out before its time is a sad one to say the least.

However, winter rolled in and come early January, my husband declared that he wanted to get a bike trainer to help him really focus on getting fit. I applauded his enthusiasm and decisiveness so I suggested it be a belated Christmas present to ourselves for the good of our health.

Off he went to research and select the right bike trainer for our needs and our budget. After reading many reviews and specs of a variety of models, he settled on the CycleTEK Momentum1 Indoor Cycling Trainer.

CycleTEK M1 Indoor Fluid Bike Trainer
The CycleTEK Momentum1 high performance indoor cycling trainer uses unrivaled technology for a smooth, quiet, high performance,indoor cycling experience. 

Now this trainer offers several features that I won't go into detail on (you can read more on their website) but one particular feature is how quiet it is. No one wants to listen to a lovely fan, tire or similar 'road' noise continually drone on for the entire duration of their workout so this to me was a very obvious and important factor. And quiet this one is. I won't say there is virtually no noise but when your cat can curl up and take a nap right next to your bike while you ride--I'd say that's a pretty good indicator.

The cost of the trainer plus the front wheel riser block and a home-made floor mat ($17 worth of utility rug runner from our local home improvement store) was over a $100 less than most similar models plus accessories.


So, armed with my Pandora app, a small wireless speaker and a book, off I went to spin along an imaginary road every other night after work. I've gone through several books and well over 200 miles in the last 3 months and I have enjoyed learning how to create variation in my workouts enough to keep things interesting.

Sometimes this involves intervals of hard and easy paces--pedaling in and out of the saddle--and other times a bit of zoning-out while continuing to spin since you don't need to pay attention the same as you would on actual streets and roads.

There is something freeing and relaxing about that. And as I've only scratched the surface of the multitude of articles, training tips and plans available, I feel this equipment is yet to become dull and boring as some have claimed.

I suppose it's all in how you approach it but for me this has been a great fit and worthy investment. Now as the weather turns warmer and I transition to the outdoors, I think I will be well suited for upcoming rides and my body will be thanking me for it.

Tuesday, January 6, 2015

2015 Wrapped in Warmth


While 2015 may be filled with hope and promise--right now it is filled with plenty of wind, ice, snow and frigid winter temperatures. So, with that thought in mind, I thought it would be fitting to complete a couple of quilts for cuddling up during those chilling nights of howling winter winds and abundant snow. Never mind that I had started these two t-shirt quilts over a year ago. Never mind that I had promised myself that I needed to finish these before I started on another custom crafting project.

It was cold outside and I wanted those blankets completed dang it! So I dug out all the needles, thread and the sewing machine to get started. Of course, once I had everything laid out and ready to sew, I realized I did not have the right needles or thread. So, one trip to Hobby Lobby (before the frigid winter storm hit) later and I completed my preparatory plans.

Two afternoons later, I am happy to say that I succeeded in finishing both quilts. The result: one quilt representing my collegiate years and one quilt reflecting fun family vacations and memories that span from kindergarten to high school.

My Collegiate Quilt: From team shirts to shirt "trophies" (shirts were often given to event champions instead of medals), this one would have definitely been appropriate for the many cold weather meets I can remember (i.e. the Concordia University Polar Dog Invite).

Now, I do not quilt in the same sense as traditional quilting. I don't know if I have the patience for that so I do the next best thing--I sew giant squares together and connect them to a blanket. This produces much faster results and avoids the pain-staking process of intricate patterns, batting and miles and miles of stitching. This method ensures a warm and cozy quilt in only an afternoon.

My "Vacation" Quilt: This one takes me way back to my early years--camp, summer vacations and even my very first swim team championship meet. Who doesn't remember those "I survived..." souvenir shirts?


As I stitched each square, I recalled a lot of special times and special people. It brought a smile to my face and I guess you could say warmth to my heart. So, as I enjoyed the season premiere of Downtown Abbey, I was able to wrap myself in something that makes me look forward to yet another year of good times and great memories.


Monday, October 6, 2014

Cycling 'round Norfolk

It has begun...my dive into the nerdy world of mapping out local cycling routes.

Norfolk cycling map

Click to download Norfolk cycling map


For anyone who hesitates to ride on anything other than established trails, I say you are missing out on so much glorious terrain! Beautiful open roads with no semis, cars or pedestrians in sight--urban dwellers would love to have such a thing.

This map is for anyone--not just the nerdy. I've made a goal for myself to make detailed and accurate maps available to anyone so that they can know where all these lovely paved tributaries exist. I want to help share the road and encourage other riders to get out there and take advantage. I have often been asked where I ride and when I try and explain it even to native locals, they seem perplexed as to what roads I am referring to.

The red lines indicate paved roads suitable for road bikes as well as others (road surfaces are subject to changes without notice). They allow a number of combinations to make your journey as short or as long as reasonably needed while simultaneously offering up scenic rural Nebraska beauty especially when the sky is blue and the sun is shining!

This map has no start or end points. I leave that to you to decide where you go and how you get there. This map simply provides some "officially" recommended roads around the city so you don't have to go unknowingly explore it all yourself...but by all means please do!

Stay tuned as I continue to add more to the map such as mileage and hopefully GPS equivalents for even more user-friendly options. Enjoy!


Saturday, April 5, 2014

How to Make a Quick and Easy Card Display

This was a project that was inspired by my mother-in-law. Her previous house had wooden louvered doors throughout the home. One in particular was a closet door in the den near the kitchen.


This door became the place, especially during the Christmas season, where she hung all sorts of cards. The cards hung by slipping them in between each louver. When she moved into her new home, she commented, "I don't have anywhere I can hang my cards!"

Now it happened that her birthday and a scheduled visit was coming up, and since she lives so far away and I had the chance to easily give her a gift in person, I decided that a hand-crafted birthday gift was the way to go. So, I went to work on a cute and functional item that I hoped would give her a new place to display her cards.

To get started, I purchased an unfinished, pine bi-fold louvered door from a local home improvement store. The door was on clearance so I paid less than $30. I went ahead and had a guy in the lumber yard cut the door in half so I could fit it easily in my car.

One side of the door after being cut in half.

I removed the hinges, filled the holes with wood filler and then lightly hand-sanded the entire surface using 180 grit sandpaper.


Once I finished sanding, I wiped them down with a dry cloth and then got to painting. Spray paint was definitely the way to go since you cannot beat how easy it is to use. The red paint required primer, however, the teal paint was a handy paint plus primer in one (awesome!). I painted both sides of each section so that the color coverage would not be an issue when hanging on the wall.


Once they were completely dry for 24 hours I deemed them good to go. I then added 3 hooks to the bottom of one of the longer sections that I was making specifically for my mother-in-law. I thought she could hang keys and such from them. I then attached picture hanging hooks to the back for easy hanging on the wall. I made sure to place the wall hanging hooks so that the louvers pointed up since that would make the cards hang easier.


Once this step was finished, I placed some cards and they were ready to hang!

These are two that I made for my own.

I (as well as my mother-in-law) think they turned out great! We look forward to changing the cards up with the seasons!


Thursday, October 31, 2013

Homemade Halloween at the House

So even though we have less then half-dozen trick or treaters every year, that's no reason not to enjoy the start to the holiday season with Halloween decorations! This year I crafted my way early and had some fun making a few holiday accents for our house. Take a look and see how easy they are. Maybe they will inspire you to make something fun, too!

So easy! 18 extra-large canning jar lids tied together in the center with twine, an old stick hot glued in the center for the stem and bits of wire curled into fun spirals. Spray painting orange optional : )

Inexpensive to make: $4 golden straw wreath from Hobby Lobby spray painted white, 1 1/2 rolls black ribbon wrapped and pinned at the ends, 1 scrap green ribbon for the bow and 2 plastic spiders for $1 at the Dollar store tied on with fishing line.

This one is also easy to make: brown stick wreath from Hobby Lobby spray painted black + assortment of black plastic creepy, crawly critters and a few selections off of a bouquet of artificial black roses hot glued or tied on by fishing line.

And to top it off, our furry and usually interactive Halloween decoration of the year keeps us company long past October 31st.


Happy Halloween!


Sunday, September 1, 2013

How to Pour Our Driveway

This is more of a brief overview than a how-to that gives some visual ideas of how this process unfolded for my husband and I.

Step 1: Dig


First, make sure you have access to a skid-steer. If you have to make repairs to it while you work, know that it is always better to break the machine than to break your back. Our driveway began by getting rid of tons of river rock and dirt that lay in the path of a future 7" thick by 11' x 81' concrete driveway. The digging step also involved creating a huge pile of dirt and rock in our backyard. This required moving the dirt again by dumping it into a rented dump trailer and driving a few miles south of town to dump it at the quarry of a local sand and gravel company.


6 loads and 10 hours of dumping, driving, shoveling and fixing the skid-steer later, one tired husband and one relieved wife were happy to see the dirt gone. To say I am proud of his efforts--learning to drive and pull such heavy loads with a trailer, fixing a number of hydraulic hoses on the skid-steer, tediously transferring the dirt from the pile to the trailer without over-turning the machine--is an understatement.

Step 2: Apply Surewall to Foundation

This step was a day's worth of work and a job that needed to be done. Once we were able to remove the old cement coating that was supposedly helping keep the house foundation together we applied a product we call "Surewall". It is like concrete in that you mix it with water and it dries to a hard surface. The point is to give added support to our 100 year-old foundation bricks.

"Beach Hat Construction" CEO inspects the area.

Step 3: Place Sand

Again, another great time to have a skid-steer. The sand we needed had to get piled in our backyard, moved around the south side of our house and then dumped and spread evenly all along the north side of our house. A friend drove by and saw us working in our new "beach" and wondered when "Beach Hat Construction" was going to get this project finished. We encouraged him to come join the party. Funny thing is that he never stopped by...


Step 4: Install Forms and Rebar

This step took more brains than brawn, and I will have to say I claimed the "dumb end" of the tape measure quite frequently. A lot of calculating and recalculating was needed before we got the angle of the forms level and sloped just right to allow water to run off in the directions we needed.


Step 5: Pour (and Pump) Concrete

This is when the anticipation, excitement and nervousness set in. The night before the big day, we both felt a sort of impending doom that would either make or break us. You don't want to mess this up, otherwise, you have 21 cubic yards of very heavy, solid material to deal with.

Given the location of our driveway, the best solution to get the concrete in the right place was to hire a concrete pumper. This meant that the concrete got pumped from the truck through a long hose. This also meant that the person managing the hose had to use every ounce of strength they had to hang on to the handle-less hose as hundreds of pounds of concrete shot out the end.


Thankfully, we had a new device at our disposal--an electric power screed attachment for our screed board. This made pulling that board over the concrete so much easier. We vibrated the board from the west to the east end of the driveway smoothing out the concrete as we moved. 


Step 6: Finish Work

Once we were done with pumping and pouring all the concrete, it was time for bull floating, edging, brooming and other finish work. It was fairly manageable to complete except for the area between our house and our neighbor's to the north. 

Thanks to our neighbor's foreman efforts, we knew exactly where to go and what to do.


In Conclusion

We started at 7:00 a.m. on a Saturday morning and finished the entire project around noon. The afternoon ended with a well-deserved lunch and everyone heading their separate ways--myself, husband and in-laws to a 2-day, 150 mile cycling excursion in Iowa and my parents back to their home. Here's to a convenient (and typical) way to park and store our vehicles!