Friday, October 30, 2015

Organizational "Nesting"

Ok, so as everyone says that the urge to "nest" often comes towards the end of the nine months of baby-carrying and that it often involves cleaning such as mopping, dusting or other tasks of that nature. Well, I don't really like to clean in that way no matter the reason but organizing on the other hand does offer some sort of satisfaction or I at least have the desire to start. So, off I went to gather the needed supplies (mostly "trash") to create these two organizational items for our house.

The first being a much more useful way to organize our ongoing collection of plastic grocery bags. The old system for storage was basically to unload the groceries or other items and then literally just stuff the bags under the sink into no container whatsoever until almost the entire left side space underneath our sink was filled with plastic bags from top to bottom/front to back.

To our credit, it was certainly easy to put them there in half a second. The problem, however, became when you wanted just one bag and you almost always ended up pulling two or more out at a time since they were so cluttered together in such an unorganized way.

So, remembering that my husband had just finished chowing through a giant box of Honey Nut Cheerios I headed to the recycle bin to retrieve it.

 I then proceeded to cut the top flaps off so it had an unobstructed opening. Then I took a roll of white duct tape and covered the entire outside of box with it. The thought was to use the box as the container for the bags and I could just stuff them in. However, as you might expect, the cardboard of a cereal box is not exactly the stiffest material so once you start stuffing it with something as simple as plastic grocery bags, the box starts to look like it might burst.

So, to provide extra support, I scrounged up 6 paint stir sticks and cut them to the width of the box. Then I hot glued 3 of them equally spaced across the width of each side of the box and then wrapped additional tape over/around them to ensure they stayed put.

The final step was to attach the box to the inside right door of our kitchen sink so that it was much easier to access and fit nicely in the inset space on the door and just inside the under-sink area. I attached the box using 6, 3M Command Strips and the final result looks like this:


This whole project took about an hour and now we actually have more space under our sink! Plus, it takes the hassle out of finding and getting our grocery bags together when we need them. Total cost for the project: about $4 for the roll of tape (in which I didn't use even half the roll) and about $3 for the box of cereal.

The second project took quite a bit longer.

This project idea I had seen something similar on Pinterest that you could buy but I had no intention of buying something like this. My goal was to make something that would help organize the extra hangers that seem to pile up in our closet and since we have limited space on our actual closet racks, I don't want to have that valuable space on the rack taken up with empty hangers so I usually tossed them into a large, plastic under bed container that I had.

This project, too, involved gathering some "trash" supplies. I actually retrieved a heavy-duty, cardboard box from the office I work in as well as some spray glue. That along with a roll of package tape, leftover fabric scraps, a utility knife, cutting board, ruler and a pencil. I had all the supplies I needed.

I started by dismantling the box so that the top and bottom flaps were not connected to each other. I then measured and folded the sides to form a triangle. This involved some cutting and taping of edges, bottom flaps and piecing-in additional areas on the bottom to create a flat, even surface on the inside and outside bottom of the box. The assemble triangle looked like this:


I used the hangers as a template for the size so that the box would be big enough for the largest of the hangers but small enough to keep them all organized and from overlapping and getting caught on each other as was the case with my current container.

Once I had this part done, I made a separate triangle piece of cardboard to place in the bottom of the container so that I could cover it separately with fabric and then place it in the bottom. This would prove to be much easier than trying to cover the bottom directly with fabric.

My next step was to cover the sides with a pretty floral fabric scrap left over from another project. I used the spray glue and adhered the fabric to the inside and outside of the box--being careful to overlap onto the bottom on both the inside and outside of the box. I worked one side at a time--spraying the glue and apply the fabric around each side. I used one piece of fabric to go all the way around the entire box. I folded the final edges under itself and glued it down so that it would not be in danger of fraying. I also put additional package tape on all the edges inside and out to further ensure the fabric stays in place and doesn't unravel.

I then covered the separate inside triangle cardboard piece with a scrap of black fabric--gluing and taping the fabric as needed. Once that was finished, I slid that piece snugly into the bottom of the new fabric-lined container.


At this point it was basically finished and I tested it out by placing my hangers inside--a perfect fit!


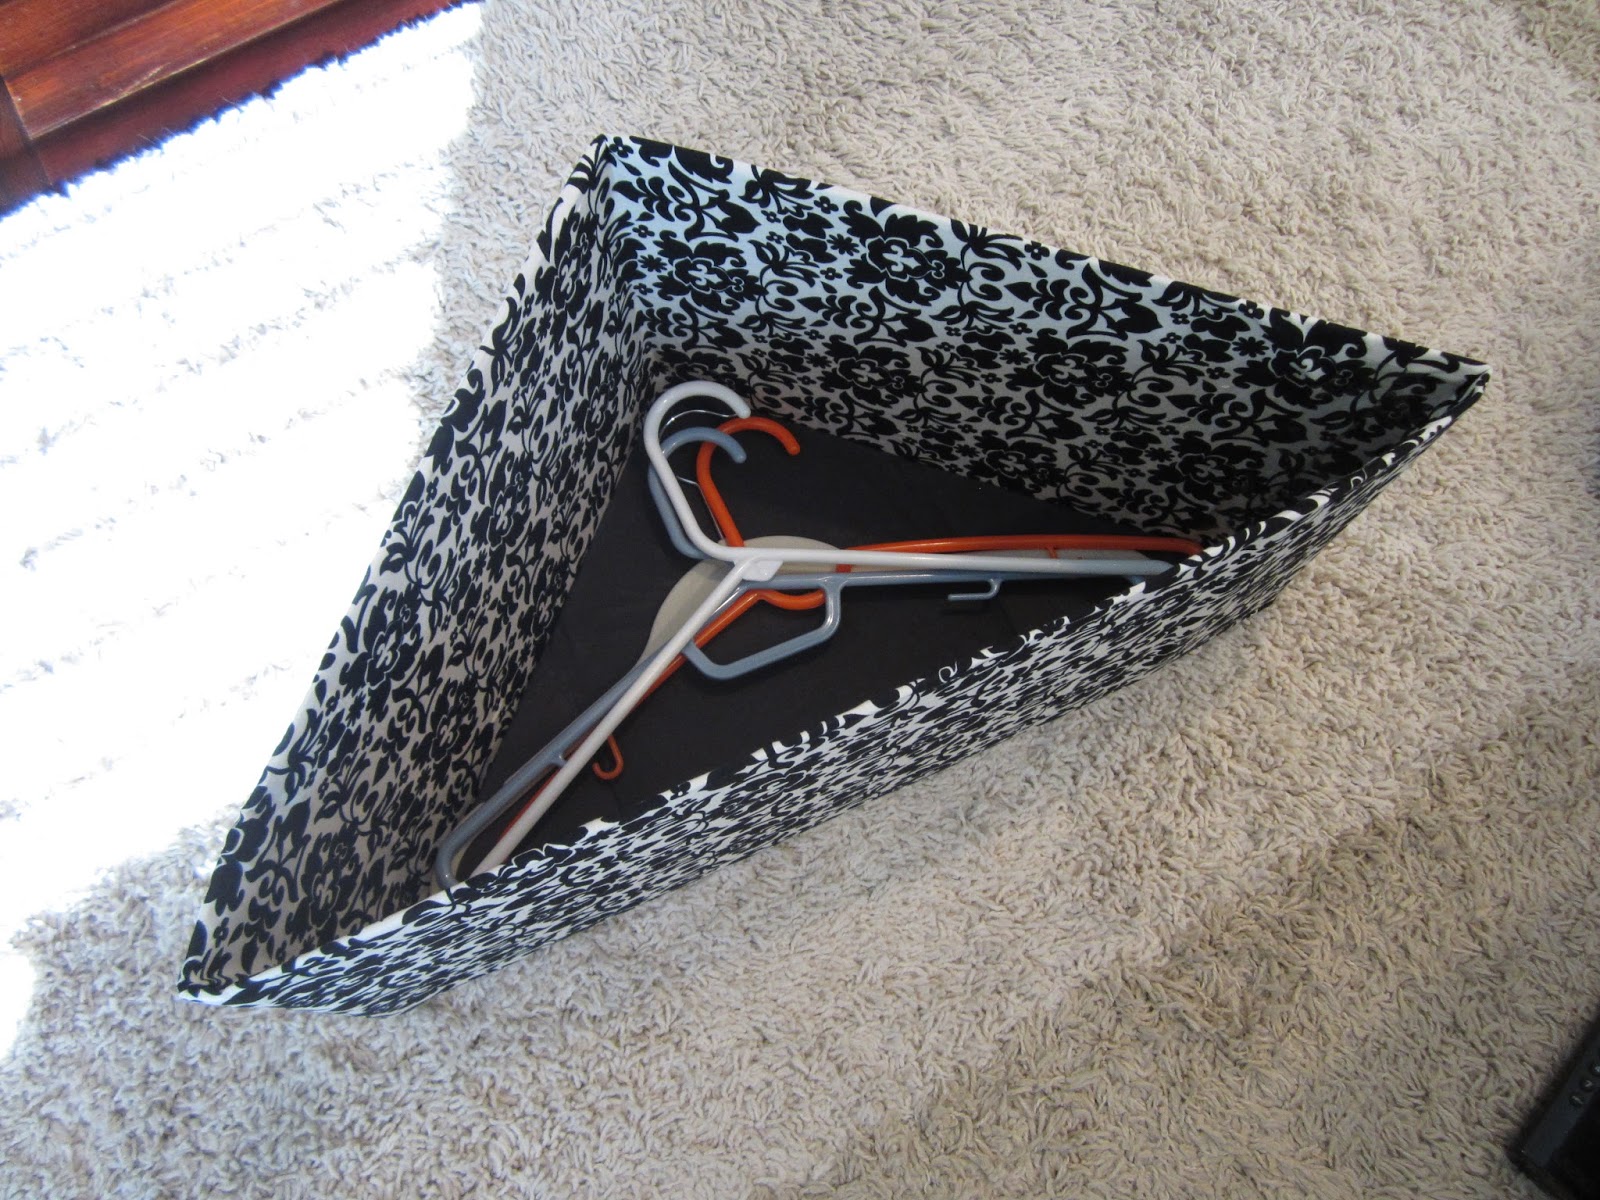
The new container fits much more neatly in our closet and takes up much less space on the floor than the old container, plus it is much easier to use as the hangers no longer get tangled up with each other.

So, success for the day was had by fulfilling a few organizational "nesting" urges and creating some more efficient items for our house. Now, time to wait for the next urge--and of course, the new, little addition to the home.

Sunday, March 15, 2015

A Bike Trainer: Taking you places you've never been

I had never rode a bike on a trainer let alone owned one before. Those are something for "serious" riders. 4 hour "training" rides indoors? Now that's just insane. But I had ran that on a treadmill before so I guess touché. I can't say I hadn't considered getting one before but in addition to the question of the seriousness of my winter biking needs, several issues always came to mind:

  1. It takes up space. Yes, it is additional fitness equipment that frankly our small, 2-bedroom home doesn't accommodate very easily.
  2. It will wear out my bike! I mean I love my bike, even if it is what 'real' bikers would call an entry-level road bike, and the thought of it wearing out before its time is a sad one to say the least.

However, winter rolled in and come early January, my husband declared that he wanted to get a bike trainer to help him really focus on getting fit. I applauded his enthusiasm and decisiveness so I suggested it be a belated Christmas present to ourselves for the good of our health.

Off he went to research and select the right bike trainer for our needs and our budget. After reading many reviews and specs of a variety of models, he settled on the CycleTEK Momentum1 Indoor Cycling Trainer.

CycleTEK M1 Indoor Fluid Bike Trainer
The CycleTEK Momentum1 high performance indoor cycling trainer uses unrivaled technology for a smooth, quiet, high performance,indoor cycling experience. 

Now this trainer offers several features that I won't go into detail on (you can read more on their website) but one particular feature is how quiet it is. No one wants to listen to a lovely fan, tire or similar 'road' noise continually drone on for the entire duration of their workout so this to me was a very obvious and important factor. And quiet this one is. I won't say there is virtually no noise but when your cat can curl up and take a nap right next to your bike while you ride--I'd say that's a pretty good indicator.

The cost of the trainer plus the front wheel riser block and a home-made floor mat ($17 worth of utility rug runner from our local home improvement store) was over a $100 less than most similar models plus accessories.


So, armed with my Pandora app, a small wireless speaker and a book, off I went to spin along an imaginary road every other night after work. I've gone through several books and well over 200 miles in the last 3 months and I have enjoyed learning how to create variation in my workouts enough to keep things interesting.

Sometimes this involves intervals of hard and easy paces--pedaling in and out of the saddle--and other times a bit of zoning-out while continuing to spin since you don't need to pay attention the same as you would on actual streets and roads.

There is something freeing and relaxing about that. And as I've only scratched the surface of the multitude of articles, training tips and plans available, I feel this equipment is yet to become dull and boring as some have claimed.

I suppose it's all in how you approach it but for me this has been a great fit and worthy investment. Now as the weather turns warmer and I transition to the outdoors, I think I will be well suited for upcoming rides and my body will be thanking me for it.

Tuesday, January 6, 2015

2015 Wrapped in Warmth


While 2015 may be filled with hope and promise--right now it is filled with plenty of wind, ice, snow and frigid winter temperatures. So, with that thought in mind, I thought it would be fitting to complete a couple of quilts for cuddling up during those chilling nights of howling winter winds and abundant snow. Never mind that I had started these two t-shirt quilts over a year ago. Never mind that I had promised myself that I needed to finish these before I started on another custom crafting project.

It was cold outside and I wanted those blankets completed dang it! So I dug out all the needles, thread and the sewing machine to get started. Of course, once I had everything laid out and ready to sew, I realized I did not have the right needles or thread. So, one trip to Hobby Lobby (before the frigid winter storm hit) later and I completed my preparatory plans.

Two afternoons later, I am happy to say that I succeeded in finishing both quilts. The result: one quilt representing my collegiate years and one quilt reflecting fun family vacations and memories that span from kindergarten to high school.

My Collegiate Quilt: From team shirts to shirt "trophies" (shirts were often given to event champions instead of medals), this one would have definitely been appropriate for the many cold weather meets I can remember (i.e. the Concordia University Polar Dog Invite).

Now, I do not quilt in the same sense as traditional quilting. I don't know if I have the patience for that so I do the next best thing--I sew giant squares together and connect them to a blanket. This produces much faster results and avoids the pain-staking process of intricate patterns, batting and miles and miles of stitching. This method ensures a warm and cozy quilt in only an afternoon.

My "Vacation" Quilt: This one takes me way back to my early years--camp, summer vacations and even my very first swim team championship meet. Who doesn't remember those "I survived..." souvenir shirts?


As I stitched each square, I recalled a lot of special times and special people. It brought a smile to my face and I guess you could say warmth to my heart. So, as I enjoyed the season premiere of Downtown Abbey, I was able to wrap myself in something that makes me look forward to yet another year of good times and great memories.